
Lifting Jepsen Tests to the Application Level
Published:
Jepsen is an open source Clojure library for testing distributed databases and systems, developed and maintained by Kyle Kingsbury since 2013. Jepsen has been extensively endorsed by vendors to test well-established softwares, where it has successfully uncovered many critical issues, such as previously unknown bugs in etcd, Kafka and Chronos.
In this blog post, I will present my firsthand experience in using Jepsen as (to be precise, extending it to) a framework for testing high-level properties of Java database applications. A basic understanding of Clojure language and Jepsen’s implementation will be assumed. Here is a tutorial to learn how Jepsen tests are structured.
Importing Java Transactions
In addition to test automation and logging infrastructures, Jepsen is equipped with a modular programming framework to define replicated data structures and their semantics under read/write operations. It comes out of the box with a number of simple object definitions and models (e.g. last-writer-wins register) which can be used to test correctness of off-the-shelf database systems in various faulty scenarios (e.g. network partitions or node clock skews) that are synthetically conducted by Jepsen throughout each test.
I however wanted to use Jepsen for triggering application-level assertions in custom transactional java programs taken from OLTPBench and was not interested in the low-level mechanisms any specific database provides. In order to do so, I utilized Clojure’s runtime environment’s ability to run pre-compiled Java code, and mapped each database operation to a java function and directed Jepsen to call them with appropriate input arguments and collect their output. For example, the operationMap function defined here relates each Jepsen-level operation (e.g. NO-TXN) to to their desired frequency (e.g. 45/100) and corresponding Java function (e.g. tpcc.NewOrder/newOrder).
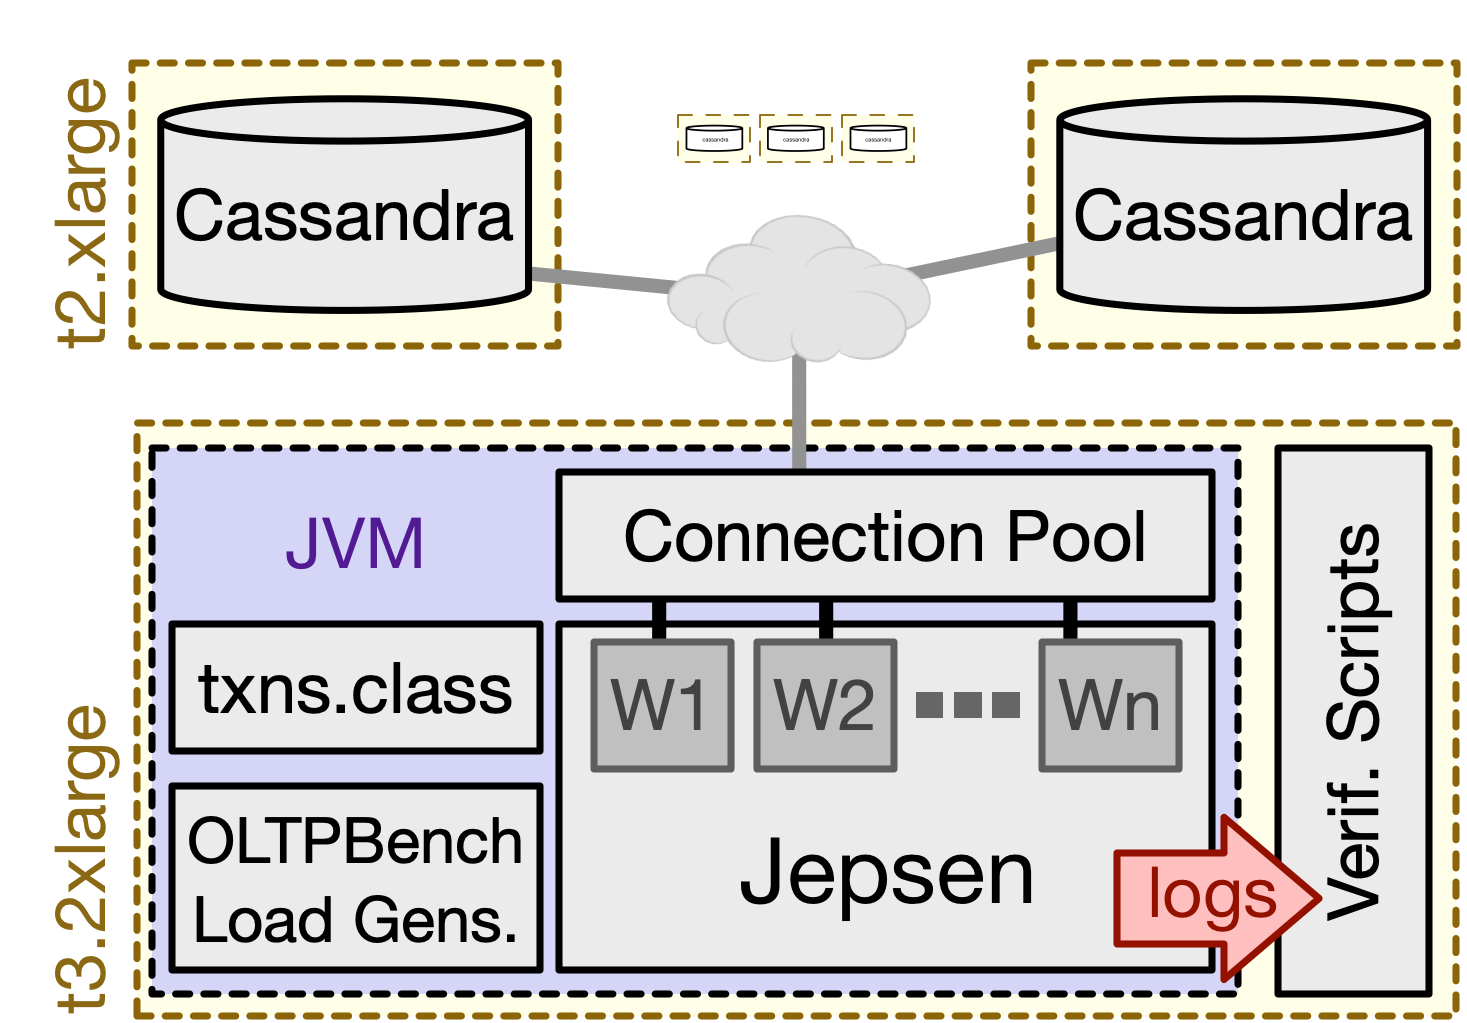
Additionally, I had to set up paths for these external java functions and any additional library. For example, checkout out my project.clj file that sets up the java-source-paths to /home/ubuntu/Jepsen_Java_Tests/src/main/java which is where I kept my compiled Java programs. The gist also depicts how I set the resource-path environment variable to the location of my desired driver (in this case Cassandra JDBC driver). I learned how to do this from this answer after hours of struggling.
Generating Input Arguments
I manually extracted necessary functions from OLTPBench source code which generate the input arguments to each function call, either based on the user-specified distribution or some real-world data. My tpcc-utils.clj file also defines how arguments are generated in getNextArgs function, using these extracted java functions. The extracted java functions can be found here.
Setting Up the Initial State
I instructed Jepsen to automatically set up a configurable number of Cassandra nodes each at a separate EC2 instance. I used the example from here to set up nodes automatically in my database-setup.clj file.
The database-setup.clj file basically contains two functions prepareKS! and prepareDB!. The latter is notably interesting where I fire up the cluster and create the tables. The function also calls Cassandra’s sstableloader function in order to load a set of user-provided snapshots for each table which hold the initial state of the database.
In my case, I used OLTPBench testing tool itself to populate a MySQL server with desired rows:
./oltpbenchmark -b tpc-c -c config/tpc-c_config.xml --create=true --load=true
Next, I dumped all tables into a .csv file:
SELECT * INTO OUTFILE '/var/lib/mysql-files/customer.csv' FIELDS TERMINATED BY ',' OPTIONALLY ENCLOSED BY '"' LINES TERMINATED BY '\n' FROM CUSTOMER;
Next, I loaded each file to Cassandra (this step is required only once):
COPY CUSTOMER(C_ID) from '/root/tpc-c/customer.csv' WITH DELIMITER = ',' AND HEADER = true AND NULL = 'N';
Lastly, I created snapshot files from the populated Cassandra node and placed them on the appropriate path for Jepsen to find them and load them before each test:
nodetool snapshot -t SSName KSName
Custom Correctness Checks
I also equipped my testing tool with arbitrary scripts that scan the database and return either a violation of the correctness criteria or a safety guarantee.
Leave a Comment